Thursday, July 26, 2007
Wednesday, July 25, 2007
Fiberglass scale cabin from rc711.com
I've finally submitted my Masters thesis so now i have time to do some more blogging about my heli addiction...
After a very long wait i have finally got the fiberglass scale cabin i have ordered at rc711.com (this link). It is exceptionally well made and features a removable windshield attached with 4 screws to the front of the body.
The cabin needs some rework in order to fit on the landing skid. In particular, the slits that accommodate the skid have to be cut-out manually. Make sure you wear proper breathing protection when cutting fiberglass with a power tool (which i regret not to have done :|).
This cabin weights around 30 grams and is more than 10 grams heavier than the original one which resulted in a 1 min shorter flight time. Surprisingly though, the additional weight of the canopy greatly improved the flight stability of the helicopter.
The heli has now a much more professional look. I will post a picture asap.
Posted by
Prince
at
11:15
1 comments
![]()
Tuesday, July 3, 2007
Schnurzz...
Fixing screws are directly dirven into 1.5mm holes in the PCB (same type of screws is used for holding the blade holders together).
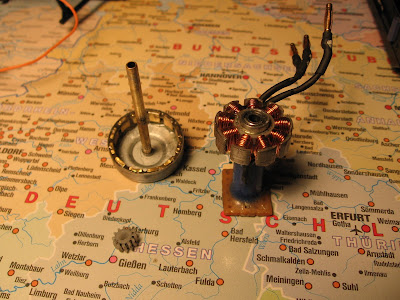
The motor was wound with a 0.4mm cooper wire, 14 windings per tooth in a star configuration. This winding works well with a 12 tooth pinion. A plastic pinion runs quieter than the metal one.
Posted by
Prince
at
01:10
0
comments
![]()
More photos...

Posted by
Prince
at
00:58
0
comments
![]()
Photos
This is my R22, you can see lots of this fiber-glass reinforced tape all over its body. The scale cabin is actulally assembled like a puzzle and held together from its inside by a layer of tape.
This is the main frame seen from behind, you can see the Schnurzz brushless motor mounted an a custom-made socket. The frame was extensively cut-out to accomodate the rotor.
Another view of the main frame...
View showing the PG-03 gyro board covered with shrink tube (right) and the stack of ESCs and V-Tail mixer (left).
Posted by
Prince
at
00:51
0
comments
![]()
Monday, July 2, 2007
Welcome to my new Blog
This is a blog I've just created to document my RC-Helicopter hobby.
I started this hobby in December 2006 when i bought myself for Christmas an E-Sky Robins R22, which is the popular E-Sky Lama V3 helicopter dressed in a scale cabin of something that resembles a Robinson R22. Not a very accurate representation but looks nice and is quite crash-resistant.
Since I've been flying and tuning this nice little heli, for quite some time, so i thought it would be a good idea to document everything in a blog.
Things that I've done so far:
- Original battery holder replaced by a combination of an elastic band and two carbon-fiber sticks - Robins accepts all kinds of LiPos.
- Tuning aluminum rotor head and swash plate.
- Carbon-fiber outer shaft, 1 cm longer than the original - lighter and helps reducing rotor blade clashes.
- Shorter flybar with adjustable weights - greatly improved maneuverability.
- Modified stock transmitter to give longer servo displacement - greatly increased fast-forward flight (FFF) speed.
- Upgrade to self made CD-ROM brushless motors (!):
- Motors dubbed "Schnurzz" in Germany were constructed from kits sold at www.cnc-modellsport.de and were fixed on self-made adapter sockets and fitted with plastic pinions bought from www.conrad.de (http://www.conrad.de/goto.php?artikel=297402, 12 tooth pinions were sparated from the gears)
- Stock receiver board was used.
- Stock ESC/gyro board was replaced by standard components including 2 Tower PRO 12A ESCs, a PG-03 micro gyro and a V-tail mixer.
- Yaw control on the transmitter was adjusted to work with the gyro, a separate potentiometer was added for yaw trim.
- Total cost:
- Motors: 2 x 15€
- ESCs: 2 x 20€
- Gyro: 30€ from Hong Kong
- V-Mixer: 10€ from Hong Kong
- Gear set: 5€
- Sums up to 115€ plus small stuff (wires, 2mm gold contacs, shrink tube, etc..)
- Installed a self-made LED low-battery alarm, with adjustable threshold voltage.
- Replaced low current stock BEC with connector 2mm gold contacts with plastic holders - improved flight time.
- Laminated rotor blades and inside of cabin with glass-fiber enforced adhesive tape (www.cnc-modellsport.de) - greatly improved overall robustness.
Flight time was increased from 8 min with stock motors to more than 13 min (until LiPo alarm goes off at 6.3V).
Currently I am short of time because busy finishing my Masters thesis. However I will provide you with some more detailed explanations including photos and plans.
My next project will be an E-Sky Belt CP which i will buy as soon as i will have enough free time.
Don't hesitate to put your comments and ask questions!
Regards,
Prince
Posted by
Prince
at
15:40
1 comments
![]()


